A way of making HTML more dynamic is
to use events, which are actions that take place when the user makes
a movement. For example, if a user clicks their mouse on a button, an event
processes the request.
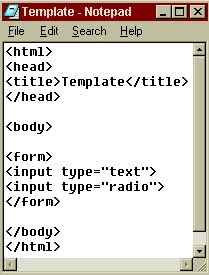
Events are most commonly used in processing forms. The image to the right shows two tags that allows users to generate an event, the FORM tags and the INPUT tags. The two INPUT types shown are "text", which creates a text box for the user to put their name or address, and "radio", which creates round buttons for the user to make multiple choices. You can assign a name to your FORM and INPUT tags by typing NAME="..." inside each tag. This way, you can reference your the tags that you have created with your JavaScript programs.
The programming that takes care of the form is called an event handler. An event handler takes a mouse click and processes the request with the proper programming. One form of event handler is the alert() method. A way of using an alert() method is onClick="alert('You clicked the button!')". You can also use a variable, such as onClick="var message='You clicked the button!'; alert(message)". One thing to remember, after the onClick=, if you use double-quotes, you must use single-quotes within the doubles, otherwise the doubles will cancel each other out. This method will produce a text box with an "OK" button at the bottom. To see how this works, click here.
Another method is the prompt() method. To use prompt, you would type, variable_name = prompt(message, default_text);. This displays a dialog box with a message, a text box, an OK button, and a Cancel button. To see how this works, click here.
 To
the left is the codes for another demonstration using both prompt and alert
methods. The page opens, asks you for your name, says "Hello", allows you
to type a number in the text field, repeats the number you entered, tells
you that the value has changed, then, when you leave, says "Goodbye". To
see how this works, click here.
To
the left is the codes for another demonstration using both prompt and alert
methods. The page opens, asks you for your name, says "Hello", allows you
to type a number in the text field, repeats the number you entered, tells
you that the value has changed, then, when you leave, says "Goodbye". To
see how this works, click here.
As you may have noticed, if you leave your name blank, your name becomes "null". This is because the user never provided any input for the promp() method. You will learn how to override this in later chapters.
It may seem like all we know how to do is display things by creating links. Many of the lessons will show templates to encourage you to try these codes yourself rather than to copy what we do. Which brings us to our next topic, links. Remember, many HTML documents contain what are called "hyperlinks". Hyperlinks, once clicked, lead you to another page or Web pages. You can create an image to act like a hyperlink. Don't get this confused with a button. This is called an "image map", which we will be discussing soon.
Buttons are FORM properties. Image maps are an extention of links. Links are anchors for a location of a page or Web page. Normally distinguished as blue, underlined text, a link has it's own destination. You create a link by inserting the A HREF="...", which acts as an anchor, followed by text and an /A tag.
An anchor uses either an absoute Universal Resource Locator(URL), such as "http://www.MyWebSite.com/index.html", or it uses a relative URL, such as "MyWebSite.html". Another relative URL would be one that you could access subfolders that are tied to your Web page, such as "/AboutMe/History.html". If you decide to use BASE tags in your Web page, then the relative URLs are relative only to that BASE tag.
Links have their own events. If you click a link, it takes you to another page or site. There are other events you can add to links. One of such is called the confirm() method. This method displays a dialog box that contains an "OK" button and a "Cancel" button. This will return the value true if the user presses the OK button or false if the user presses the cancel button. To see how this works, click here.
Two other events is the MouseOver and the MouseOut events. A simple and popular property of these is the status=' '; property. This link shows how the MouseOver event works, and this link shows how both events work (NOTE: These may not work well or at all on newer versions of Internet Explorer or Netscape.).
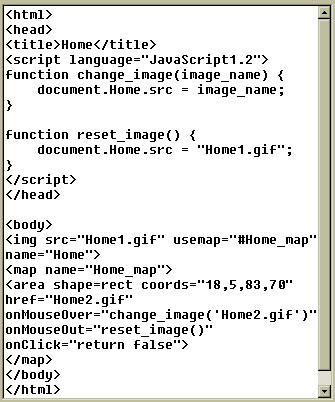 Now
that we've learened so much, we can create an image map. An image
map is an image that is divided into regions called hot zones. The
image to the left shows the code for creating an image map. First, you
need two or more images that will be used in the map. Next, we created
the functions in the HEAD of the document that will take care of changing
of the image during MouseOver and resetting the image on MouseOut. Then,
in the BODY, we added the IMG SRC tag that will insert the first picture
we want the user to see. Included in this tag is the property usemap
that tells the program what map we will be using. Next, we created the
map that will be the base of what we are trying to create. In the next
tag, the AREA tag, is where it all comes together. We chose the shape rect
to cover the image we are using. You can also use circle and poly
to cover circles and polygons. Then, we gave the coordinates of the rectangle
to show the active area. The coordinates were given in pixels, or
picture elements. We included the HREF so that browsers that aren't fully
JavaScript compatible will be able to run the map. Then, we added the MouseOver
and MouseOut events so that when the user moves their cursor over the image,
the image will change and then change back. Finally, we inserted an onClick
event to take care of any mouse clicks so the link wouldn't try to go anywhere.
Now
that we've learened so much, we can create an image map. An image
map is an image that is divided into regions called hot zones. The
image to the left shows the code for creating an image map. First, you
need two or more images that will be used in the map. Next, we created
the functions in the HEAD of the document that will take care of changing
of the image during MouseOver and resetting the image on MouseOut. Then,
in the BODY, we added the IMG SRC tag that will insert the first picture
we want the user to see. Included in this tag is the property usemap
that tells the program what map we will be using. Next, we created the
map that will be the base of what we are trying to create. In the next
tag, the AREA tag, is where it all comes together. We chose the shape rect
to cover the image we are using. You can also use circle and poly
to cover circles and polygons. Then, we gave the coordinates of the rectangle
to show the active area. The coordinates were given in pixels, or
picture elements. We included the HREF so that browsers that aren't fully
JavaScript compatible will be able to run the map. Then, we added the MouseOver
and MouseOut events so that when the user moves their cursor over the image,
the image will change and then change back. Finally, we inserted an onClick
event to take care of any mouse clicks so the link wouldn't try to go anywhere.
To see how this map works, click here.
Question: Cool! This seems like it will be fun to learn. But how do I make JavaScript work like Java?
Answer: Fortunately, JavaScript has some of the same data type and operators. In the next lesson, we'll take a look at how these work.
Return to : Java
Programming Hints and Tips